Implementing an OAuth2 IDP Server
Follow this guide if:
- you have a database of your customer's username and password (or other credentials)
- and you want to replace the Business App login screen for customers with your own
- and you are not building a marketplace app
- and you could not find a commercial or open source OAuth2 tool that is compatible with your website.
To implement the parts of OAuth2 used by Vendasta, you need to create and configure three endpoints.
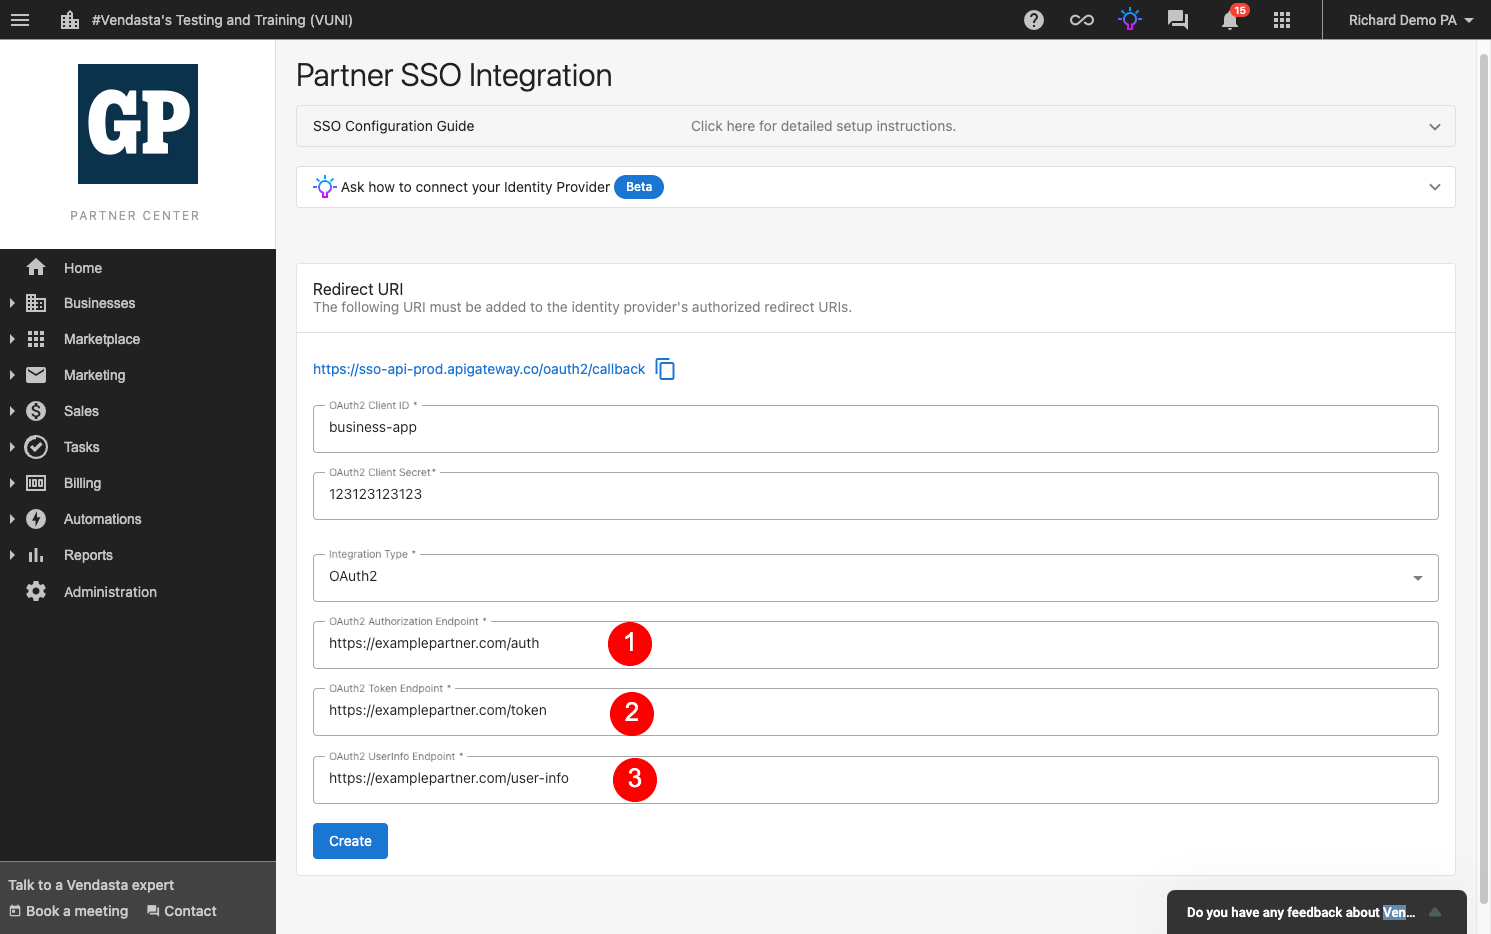
- Authorization Endpoint - This is your login screen displayed in the user's web browser
- Token Endpoint - This is called by Vendasta's servers to complete the login flow
- User-info Endpoint - This is called by Vendasta's servers to get more details on the user identified by the access token returned by the token endpoint
You can reuse these endpoints to replace the login screen of other websites that follow the OAuth2 standard. To tell the websites apart you will need to assign them each a client_id and client_secret. The values can be anything you choose.
If you are not familiar with OAuth2 we recommend reading Okta's illustrated guide to OAuth2 and OpenID Connect for an more detailed introduction to the concepts.
Authorization Endpoint
When a user tries to access one of Vendasta's centers or a marketplace app in a web browser Vendasta's SSO system will check to see if the user is already logged into Vendasta.
If the user is not logged in we will redirect the user's web browser to the OAuth2 Authorization Endpoint that you configured along with a bunch of query params.
Example:
https://examplepartner.com/oauth2/authorize? client_id=business-app & redirect_uri=https://sso-api-prod.apigateway.co/oauth2/callback & response_type=code & scope=openid%20email & state=f9376d0d-badd-48b4-bf8a-872978aa0098
The endpoint should:
- Verify that the
client_idis an expected value - Prompt the user to log into your platform if they are not already logged in
- If you have a different database of users for employees vs customers you may want to display an "Employee Login" button alongside your customer login form
- Optional: Show the user a screen letting them know the website (based on
client_idparameter) that they are about to log into and the permissions the website has requested (based onscopeparameter) and get their consent the first time they SSO into the website - Generate a random string to use as the auth
code. Store it in a database or cache along with the id of the logged in user, client_id, scopes the user consented to and an expiry time a few minutes in the future. - Redirect the users web browser to the URI specified by the
redirect_uriparameter along with?code=<auth code you generated>&state=<state query parameter from request>
Example redirect:
https://sso-api-prod.apigateway.co/oauth2/callback? code=jkhhh-werwerw-sdfsdf-werwerw-werbadsfwer & state=f9376d0d-badd-48b4-bf8a-872978aa0098
Note: We call the token and user-info endpoints from our servers so PKCE is not required. If you have other clients (websites/apps) that do the login flow entirely in a web browser then you should verify the
redirect_uri,code_challengeandcode_challenge_methodparameters as defined in the PKCE code flow spec.
Token Endpoint
Your token endpoint will be called by Vendasta's servers to exchange the authorization code generated by the authorization endpoint for an access token. Vendasta's client_secret will also be sent so you can verify that only Vendasta can make the exchange.
Example Requests
POST https://examplepartner.com/oauth2/token
Authorization Basic base64(client_id:client_secrect)
Content-Type	application/x-www-form-urlencoded
Body
code=jkhhh-werwerw-sdfsdf-werwerw-werbadsfwer &
grant_type=authorization_code
or
POST https://examplepartner.com/oauth2/token
Content-Type	application/x-www-form-urlencoded
Body
client_id=business-app &
client_secret=123123123 &
code=jkhhh-werwerw-sdfsdf-werwerw-werbadsfwer &
grant_type=authorization_code
The endpoint should:
- Verify the
client_secretis correct for theclient_id - Retrieve the record that was stored for the authorization
code - Verify the
client_idmatches the one on the code record - Verify the code record is not expired
- Delete or expire the code record to prevent it being used again
- Generate an access token that can be used to call the user-info endpoint
- Respond with JSON
HTTP/1.1 200 OK
Content-Type: application/json
Cache-Control: no-store

{
  "access_token":"ZjNGZmZjI3MTQ0NjJkM2NDE1ZTZmQ5OT",
  "token_type":"Bearer",
  "expires_in":3600
}
The access_token can be any identifier you desire. They are typically JWTs that expire in a few minutes.
User-Info Endpoint
Vendasta's servers will then call your user-info endpoint with the access token that was just received to get details about the user that just logged in.
GET https://examplepartner.com/oauth2/user-info
Authorization Bearer ZjNGZmZjI3MTQ0NjJkM2NDE1ZTZmQ5OT
The endpoint should:
- Verify that the access_token sent in the authorization header is not expired
- Look up the user profile associated with the access token and return the details as a JSON object
Vendasta currently only requires the Subject ID (sub) or email fields to be populated in the response. The full set of standard fields can be found here.
Vendasta will match the user info to a user in our platform based on the following checks
- Sub matches a Vendasta user id
- Sub matches the external id sent for a user sent when syncing them using SCIM
- Email matches a user in your partner instance
You will need to create the user and set their permissions in Vendasta ahead of time. See IDP User Synchronization for directions on automating it.
Example response
HTTP/1.1 200 OK
Content-Type: application/json
{
  "sub": "U-b10e6de6-ee43-429c-ac26-b3cb81ef6f5f",
  "email": "bob@example.com",
  "email_verified": true,
  "given_name": "Mary",
  "family_name": "Smith",
  "locale": "en",
  "created_at": 1566245652,
  "updated_at": 1611083679
}
Testing
Once you have built the endpoints add them to your configuration at Partner Center -> Administration -> Single Sign On
As soon as you save the default Business App login screen will be replaced with your own. You can still send users to the default one by sending them to <your-business-app-domain.com>/login/.
Next Steps
Once you have completed setting up Single Sign On from your system, you may want to implement Single Logout or IDP User Synchronization.