SSO: OAuth2 3-Legged Flow
Overview
This guide aims to help you configure your application to use Vendasta’s Identity Gateway as its Identity Provider. This will allow you to identify users entering your application from the Vendasta platform and will in future API iterations allow you to call Vendasta APIs on their behalf.
Vendasta implements the OpenID Connect Core specification(OIDC), which includes a complete OAuth 2.0 Authorization Framework integration.
This guide is for implementing a 3-legged OAuth flow. The distinction between 2-legged and 3-legged flows is as follows:
| Access Level Provided | Setup Required | |
|---|---|---|
| 2-legged flow (Partner Service Account) | Access to high-level Vendasta workflow APIs, but no access to user data or business data. Not currently used by Vendors. | Allocating a Partner Service Account. Configuring an OAuth2 2-legged client. |
| 3-legged flow (this guide) | Access to user data and business data associated with the user performing the flow. | Follow this guide. Requires an end user to initiate the flow to provide access to the app. |
SSO Checklist
- Choose frontend or backend authorization flow
- Choose a library, or service to use
- Generate OAuth Client in Vendor Center
- Build Entry URL & Logout endpoints, and register them in Vendor Center
- Determine how you will sync Users
- Build Session Transfer workflow
- Test as you go from Business App
- Make dashboard adjustments
- Request a review of your work
Step 1: Technology Review
Your first decision you will need to make is where you will implement your authorization flow:
- (Recommended) Backend workflow: implement the workflow within your secure webserver
- Frontend workflow: implement the workflow using Javascript within a Single Page Application
We recommend implementing your authorization flow on the backend in most cases as it is easier to setup, secure, and use. However, Single Page Applications would likely prefer a Frontend Workflow so that tokens can be more easily refreshed. (NOTE - Refresh Tokens are not yet supported)
Both OpenID Connect and OAuth2 are standardized workflows, which means most programming languages have at least one library available to aid your implementation whether you choose to implement the workflow on the frontend or on your backend.
You can find a list of compliant OAuth2 libraries here. Please select a Client Library in your language of choice.
Whichever client library you select, please consult the included documentation for the library of your choice to supplement this guide.
Backend Clients
Clients running on a backend web-server will use their client secret for verification. Client secret generation is covered in Step 2.
Frontend Clients
Frontend clients should use the PKCE(Proof Key for Code Exchange) flow. It is recommended that you find an OAuth2 library which supports this feature. PKCE Spec Details
Security Note
Recent advancements in user privacy controls in browsers blocking access to third-party cookies mean you may need to employ additional efforts to keep your flow secure.
The implicit grant flow is considered insecure and should be avoided.
Step 2: Initial Configuration
Vendor Center-->Product-->Integration Page-->Access and SSO
Generate your OAuth Client
Toggle 'Enable SSO' on, then click Create Configuration
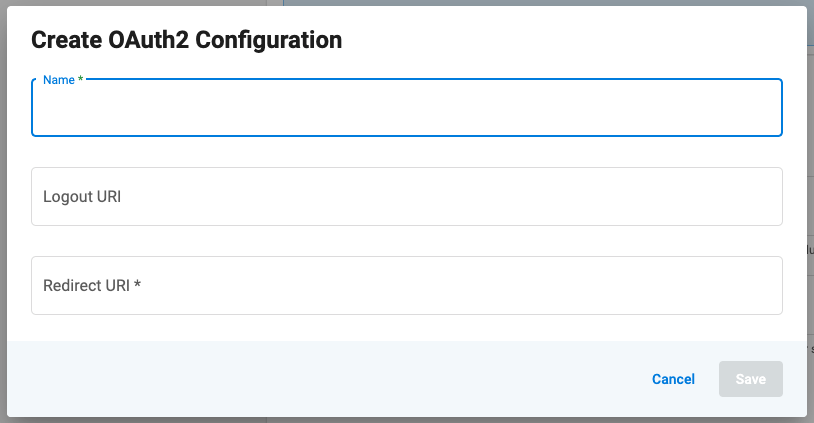
After saving your configuration, a modal will pop up with your new client id and secret. Ensure you save your client secret before closing the modal, otherwise you will need to delete and re-generate your client.
| Client Fields | |
|---|---|
| Logout URL - (Proposed) | Front end logout url (Not yet functional - may be left blank). Will pop open a hidden iframe and redirect to this url. For back channel logouts, please utilize the logout webhook in the main Access and SSO section. |
| Redirect URI | Sometimes referred to as a 'Callback URL' - The URL of the page where the user will be redirected after a successful authentication. This value must match the redirect_uri originally used to generate the Authorization code. |
Configure SSO Settings
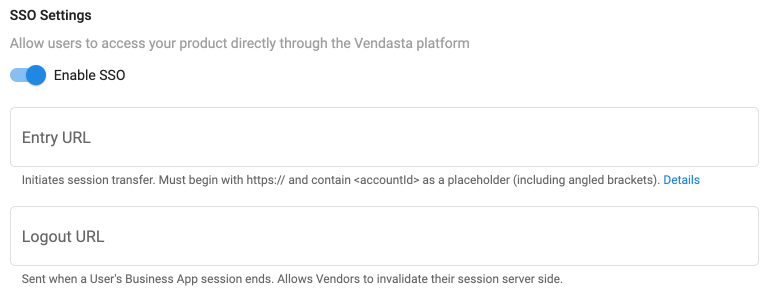
| Entry URL | The url that acts as the entry point for the product. This could be redirected to from various dashboards or emails. Prior to redirect the account_id is injected into the placeholder on the url, and should be appended as an additional url parameter on the Authorization URL to trigger the start of the session transfer. Optionally may support a nextUrl url param for deep linking. This may be encoded into the state variable on the Authorization URL to be passed through the Session Transfer flow. |
| Logout URL | A webhook for back channel logout of service provider session. As a user could have multiple open sessions across browsers and devices it is recommended that you utilize the provided session_id rather than the user_id unless you intend to log them out of all active sessions. |
Library or Service Configuration
Follow your service's installation guide, entering the following information where prompted:
| Issuer | https://iam-prod.apigateway.co |
| Well-Known(OIDC Discovery) | https://iam-prod.apigateway.co/.well-known/openid-configuration |
| Authorization URL | https://sso-api-prod.apigateway.co/oauth2/auth?account_id=<account_id> (see Contextualizing your Auth URL below) |
| Token URL | https://sso-api-prod.apigateway.co/oauth2/token |
| Logout/End Session URL | https://sso-api-prod.apigateway.co/oauth2/logout |
| JWKS URL (optional) | https://iam-prod.apigateway.co/oauth2/v1/certs |
| User Info URL (optional) | https://sso-api-prod.apigateway.co/oauth2/user-info |
| Client ID | Obtained when creating your OAuth2 configuration within the Vendasta Platform |
| Client Secret (backend only) | Obtained when creating your OAuth2 configuration within the Vendasta Platform |
Step 3: Session Transfer Implementation
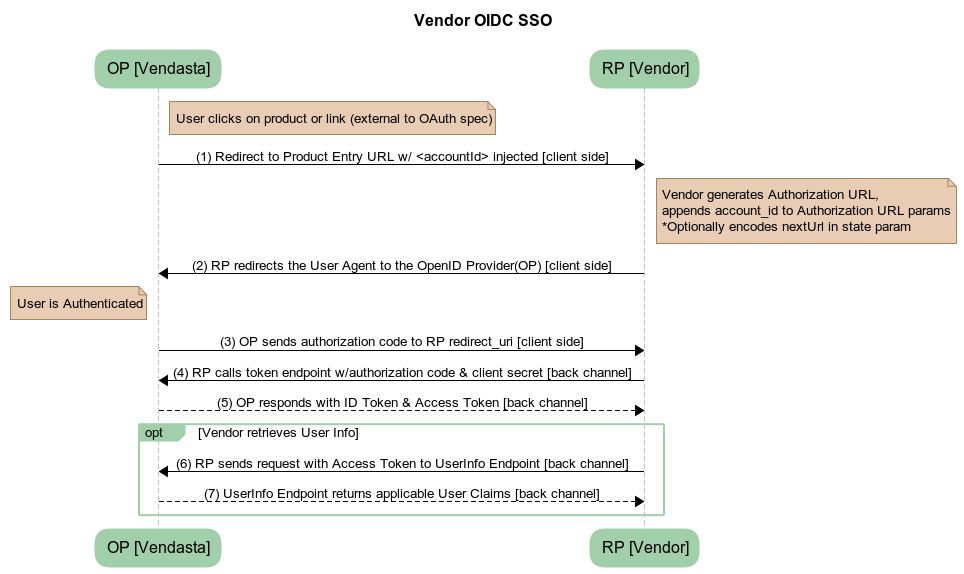
Authorization URL
The redirect to the OAuth Authorization URL initiates SSO. The library that you chose to use likely has a function for generating the OAuth Authorization URL based on your configuration.
Your Authorization URL will look something like this:
GET /oauth2/auth?
 account_id=AG-XXXXXXXX
 &response_type=code
 &scope=openid%20profile
 &client_id=a69cc85c-6d80-4294-a333-8401715fb36f
 &state=sdf2k2rf%3AAG-XXXXXXXX%3AMP-XXXXXXXXXXXXXXXXXXXXXX
 &redirect_uri=https%3A%2F%2Fclient.example.org%2Fcb HTTP/1.1
 Host: sso-api-prod.apigateway.co
The state param is optional, but recommended. In addition to helping avoid CSRF attacks by using a unique and non-guessable value associated with each authentication request it may be used to pass data through the entire SSO flow as it is included when the OP redirects to the RP callback url.
Additionally the Entry URL supports a nextUrl param, which can be passed through SSO using the state to enable deep linking.
Contextualizing your Authorization URL(Required)
Vendasta users may belong to any one of our many partners, and each partner may select one of several login methods. Additionally end user access is white-labeled. The branding to be displayed to the user could depend on the market_id of the Account.
Thus in order to direct the user to the login screen that is specific to their account, we need to know which account they are attempting to access.
Most OAuth2 libraries will allow you to add additional context to your Authorization URL with query parameters(though in some cases you may need to do this manually, or extend your library). Before initiating an OAuth2 flow, provide options to your OAuth2 library to set the account ID to the account_id query parameter.
Prompts(Optional)
Note that Vendasta tracks user's scope acceptance for your Product. Unless you want to override the current default value for this user's entry to your product you may exclude the prompt query parameter from your Authorization URL.
The following values are supported for the prompt query parameter.
| none | Do not prompt the user for consent or to log in. Will result in an error if the user does not have an active session or has not previously provided consent. This is useful for acquiring fresh tokens for a user who has logged in recently and likely has an active session. |
| login | Prompt the user to log in, ignoring an existing session if one exists. |
| consent | Prompt the user to provide consent for accessing the requested scopes. prompt=consent is required when requesting the offline_access scope. |
Scopes(Required)
In order to call APIs on behalf of a user, you must specify which scopes your app needs access to. Currently there are no APIs other than the User Info endpoint that utlize the Access Token granted from the token endpoint for authentication. The Marketplace V1 API currently uses a separate method for generation of its Bearer Token.
SSO Scopes
Certain scopes have a special meaning for sso, or are distinct from those used for API access. Each scope is optional, but at least one scope must be specified.
openid Optional | This scope MUST be included when performing an OpenID connect flow. |
profile Optional | Grants access to view a user’s name, locale, and Vendasta roles via the user-info endpoint. |
email Optional | Restricted Scope |
Token Endpoint
The token endpoint accepts authentication via the request header or body. The OAuth2 spec suggests using the Authorization header with the Authorization: Basic encodedString format, where the encodedString is a result of Base64 encoding the OAuth client data as client_id:client_secret.
Example:
curl -X POST 'https://sso-api-prod.apigateway.co/oauth2/token' \
--header 'Content-type: application/x-www-form-urlencoded' \
--header 'Authorization: Basic NWIwNDYwNzctZjM5MS00YzdjLTliMDYtNmVjOWNmZTgwODYzOkVWbkdaaXNjU1k4R2Zud1Z6bnJweTg3RTQ2UGZsR3ZZSmc3VGhIR29kVw==' \
--data-urlencode 'grant_type=authorization_code' \
--data-urlencode 'redirect_uri=https://yourredirecturi.com/somepath' \
--data-urlencode 'code=13a75b73-a1c5-49f7-ad85-9086f3c0f0b0'
Access Tokens
Access tokens expire 30 minutes from the time of issue. They will need to be refreshed by redirecting the user back through the authorization process (backend)**. If the user’s token has expired, or is close to expiry, you can fetch a new one by re-initiating the OAuth2 authorization flow. You may pass the prompt=none query parameter for users who have already given consent to avoid displaying the consent dialog again, which should allow a seamless redirection back into your Product.
All access token claims are subject to change without notice, and should only be inspected for debugging purposes.
ID Tokens
An identity token will be provided in the response from the token endpoint. Identity tokens are compliant with the OpenID Core ID Token specification.
ID tokens are valid for 30 days.
In addition to the core ID token claims, the token will also include requested identity data claims such as the OpenID Standard Identity Claims.
Here is an example payload of an ID token after decoding, note that fields may be absent if unavailable:
{
  "iss": "https://iam-prod.apigateway.co",
  "sub": "U-e7851c53-8a49-4c89-90fd-7a8140888c02",
  "aud": "<my_client_id>",
  "exp": 1311281970,
  "iat": 1311280970,
  "name": "Jane Doe",
  "given_name": "Jane",
  "family_name": "Doe",
  "gender": "female",
  "birthdate": "1990-10-31",
  "email": "janedoe@example.com",
  "email_verified": false,
  "phone_number": "+1 (425) 555-1212",
  "phone_number_verified": false,
  "locale": "en-US",
  "updated_at": 1311220970
}
Per the OpenID specification, ID tokens are JWT encoded. When troubleshooting your integration you can use https://jwt.io/ tool to inspect the contents.
User Management
The Personas that a user has may be found in the role list in the User-Info endpoint response. Where a User logs in will determine what Persona their current session is utilizing. A Vendor may choose to map these roles to equivilent permission sets on their side.
| Roles | |
|---|---|
partner | Reseller admin user. A user with this role is able to access every dashboard in the Vendasta Platform, but mainly interact with Partner Center, the Reseller administrative dashboard. This persona is never associated with an Account. |
smb | An end busines user. Typically the Business Owner, and their employees. A user with this role and no other is only able to log into Business App. This persona is directly associated with Accounts. Due to the legacy practice of Impersonation, many Reseller users will have this role in addition to their higher level roles. Note that OAuth SSO doesn't support impersonation, and even with an impersonated session the partner persona legacy_user_id will be surfaced in the Get-Info Endpoint response rather than that of the smb persona being impersonated. |
sales_person | A user with this role is able to interact with the Partner level Sales CRM dashboard Sales & Success Center. |
digital_agent | A user with this role is able to interact with the Partner level task management dashboard Task Manager. |
Note that the user_id referred to by the v1 Marketplace API, Webhooks, and the Order Form End User field directly maps to the legacy_user_id returned in the OAuth User-Info Endpoint.
User Syncing
Email & User Identification:
Emails should not be used to identify an individual. Also, though email is a valid OIDC scope, users should have more awareness and control around providing their email for use by third parties. This is why at this time email is a restricted scope for the Vendasta SSO service, and we recommend that if your application's User entities require email as primary key, that you generate a dummy email. To uniquely identify a user from Vendasta you may use the user_id provided as the sub claimn in the OIDC User-Info endpoint, as well as by the legacy_user_id that is used by the Marketplace V1 API.
User Syncing Options:
a) JIT(Just In Time): User creation on the fly using data from the User Info endpoint is recommended. This is the only way to allow for syncing of Partner Admin users. This is also the only way to get the user_id(sub in the User-Info response) rather than the legacy_user_id at this time.
b) Sync users via the Marketplace v1 API & Webhooks: May be used if only Business Users(a user with only the smb role) are allowed to interact with your Product. Create users at time of provisioning, and then manage them moving forward based on webhook triggers and subsequent API interaction.
c) Many:1 Session Transfer: Do a many:one session transfer from any Vendasta user into a single dummy user on the Vendor side. Typically used when a Vendor doesn't have User entities.
d) Order Form: There is a special order form field type End User which will provide the user filling in the form with a dropdown to select any of the SMB persona's associated with the account. If this field type is configured on your order form, the legacy_user_id will be provided in the provisioning webhook order_form object for this custom field.
Entry Context:
The roles array will inform you if a user has the partner role, and is thus a Reseller user. You aren't able to learn from the User-Info response however what persona this user has accessed your product with the current request. The v1 Marketplace API Get User endpoint can determine if the legacy_user_id belongs to an SMB persona. A legacy_user_id belonging to a partner persona will provide a 403 or 404 response.
User Info Endpoint
The User Info Endpoint is available to any Product which has acquired an Access Token from the OAuth2 flow. However, the information it provides is scaled according to the scopes on your access token.
Here is the User Info URL:
https://sso-api-prod.apigateway.co/oauth2/user-info
You may make a GET or POST request to this endpoint. Include the Access Token retreived from the token endpoint in the request AUTHORIZATION header, replacing the token with your own:
Authorization: Bearer eyJhbGciOiJIUzI1NiIsInR5cCI6IkpXVCJ9.eyJhdWQiOiJodHRwczovL2lhbS1wcm9kLmFwaWdhdGV3YXkuY28iLCJleHAiOjE2MTExNjEyMDQsImlhdCI6MTYxMTE1OTQwNCwiaXNzIjoiaHR0cHM6Ly9pYW0tcHJvZC5hcGlnYXRld2F5LmNvIiwic3ViIjoiVS1lNzg1MWM1My04YTQ5LTRjODktOTBmZC03YTgxNDA4ODhjMDIiLCJmZWRlcmF0ZWRfaWRlbnRpdHlfcHJvdmlkZXIiOiJvYXV0aCIsInVzZXJfaWQiOiJVLWU3ODUxYzUzLThhNDktNGM4OS05MGZkLTdhODE0MDg4OGMwMiIsImtpbmQiOiJhY2Nlc3MiLCJzY29wZSI6InByb2ZpbGUgZW1haWwgb3BlbmlkIiwia2lkIjoiOWZjMGEyYWNlMTNjZjdjOTBiM2ZmZjcxODkzZGJjODAiLCJlbWFpbF92ZXJpZmllZCI6dHJ1ZX0.s12fKo19qKBR4CjMlXqkV0KxksieY7jlgT7Ryg9PH68
The amount of information returned is determined by the scopes requested on the Authorization URL:
email | Email is currently a restricted scope Please use the sub field returned by the user-info endpoint to uniquely identify the user. |
profile | Grants access to view a user’s name, locale, and Vendasta roles using the user-info endpoint. See the User Info Endpoint section for more information. |
openid | Include the user_id (the sub claim), and namespace. |
{
    "sub": "U-b10e6de6-ee43-429c-ac26-b3cb81ef6f5f",
    "email": "mary@example.com",
    "email_verified": true,
    "namespace": "ABC",
    "name": "Mary Smith",
    "given_name": "Mary",
    "family_name": "Smith",
    "locale": "en",
    "updated_at": 1611083679,
    "namespace": "ABC",
    "roles": [
        "partner",
        "sales_person",
        "digital_agent",
        "smb"
    ],
    "legacy_user_id": "UID-1234",
    "created_at": 1566245652,
    "product_navbar_data_url": "https://www.smblogin.com/api/user/U-b10e6de6-ee43-429c-ac26-b3cb81ef6f5f/products-navigation-bar-data/"
}
Security Note
From OIDC spec point 5.3.2 - "NOTE: Due to the possibility of token substitution attacks (see Section 16.11), the UserInfo Response is not guaranteed to be about the End-User identified by the sub (subject) element of the ID Token. The sub Claim in the UserInfo Response MUST be verified to exactly match the sub Claim in the ID Token; if they do not match, the UserInfo Response values MUST NOT be used."
User Access Check(Required)
OAuth based sso specs do not include clear guidance on access checks. Vendasta requires that after session transfer completes that the Check User Access to an Account endpoint be called prior to redirecting the user to the product. If the response to this HEAD call is 403, then a 403 error page must be displayed. Unlike the Get User endpoint, this check does support legacy_user_ids for partner personas, and will ensure that the namespace of the Account and Partner user match.
Session Management
The Vendasta Business App session length is 30 days. If your session is shorter than this then upon session expiry you should route the user back through the Authorization URL
Step 4: Modify Dashboard
Navigation Bar(Required)
The Vendasta NavBar provides a seamless navigation experience for users to switch between your marketplace Product, other Products, and their Business Center. User logout will also be served by this bar, and hidden from your dashboard. Implementation of the Navigation Bar is required if your integration includes SSO.

Include the script tag below before the closing body tag of your HTML to allow for rendering of the Navigation bar. All the data- attributes in the script tag are required to be passed as when loading the Product dashboard. The Navbar should load on every page of the Product.
It is recommended that you build the entire script tag before injecting it into the page rather than injecting the custom params individually. This will avoid a race condition where the script runs before the parameters are present, resulting in an empty navbar frame.
HTML TEMPLATE
<!-- include the following script tag before the closing body tag to render the navigation bar in your app -->
<script src="//www.cdnstyles.com/static/product_navbar/v1/product_navbar.js"
        data-url="{{ product_navbar_data_url }}"
        data-account-id="{{ account_id }}"
        data-app-id="{{ app_id }}">
</script>

OR if including target-element-class

<!-- include the following script tag before the closing body tag to render the navigation bar in your app -->
<script src="//www.cdnstyles.com/static/product_navbar/v1/product_navbar.js"
        data-url="{{ product_navbar_data_url }}"
        data-account-id="{{ account_id }}"
        data-app-id="{{ app_id }}"
        target-element-class="{{target_element_class}}">
</script>
Script parameter details:
vendasta.com/marketplace/product_navbar_data_url | This is the endpoint the product navbar script will use to retrieve the data to populate the Vendasta navigation bar. To be retrived via the OIDC User-Info endpoint. |
data-account-id | The unique ID for a Vendasta Account. This is passed to the Service Provider via the Entry URL. |
data-app-id | The unique ID for a Vendor Product. Found in the Vendor Center URL when in the context of a Product. |
target-element-class(optional) | This field can help overcome css conflicts with the NavBar. It allows you to specify an element that has a unique class. If the element with this class exists on the page at the time the NavBar is called to render the bar, it will place the bar directly above the target element |
Product url contextualization
In the case that a user has bookmarked your product's dashboard url unless you have something identifying [This is a Vendasta account & What account it is] you are unable to properly authenticate the request, as the Authorization URL requires the account_id be included.
Thus contextual urls for your Vendasta Product are suggested, with a long lived cookie, or browser caching being less robust alternatives for keeping track of the last account entered, and the fact that the account belongs to a Vendasta reseller.
In Product Purchases
To ensure all purchases are centralized for our Partner, any purchase related to a Vendor product must be accomplished through the Vendasta platform.
If your product has CTAs for in-product purchases, including upgrades, or Add-on purchases these CTAs need to be: a) Hidden completely b) OR or have any actual purchase capabilities remove, and the copy made to be 'generic' - simply directing the user to purchase the sku without actually referencing them to where they may do so.
Testing
Functionally testing SSO can be accomplished by redirecting to the Authorization URL in the browser. This will result in a prompt for user login, and scope acceptance.
For an end to end test
- Publish the product using the status column in the Vendor Center Products list so it can be interacted with in Partner Center
- Create an Account in Partner Center for testing with.
- Activate the product on an Account. This will give you access to the v1 Marketplace API for this
account_id - Access the Business App for this Account. This can be done via the kabob menu on the Account List, or by using the 'Open in' dropdown in the top right of the Account Details page.
- Click on the icon of the product on the left nav to redirect to your
Entry Url. Check the 'My Products' page if it's not in the left Nav as there may be enough products active that it wasn't automatically pinned.
Example implementation
To see a demonstration of requirement 2 in action check out these examples:
- Java Springboot app